Help Zbrush Draw Only One Tool
ZBrush is one of the easier 3D tools to get to grips with, meaningful that with plenty of practice and the rightish tutorials, you can soon create your own 3D prowess. However, if your aim is disorienting results that are suitable for the big screen, then you're going to make to up your game a lot.
- The 17 best ZBrush tutorials
Aside from checking out our list of great ZBrush tutorials, to help you out, we asked four A-list artists – Maarten Verhoeven, Gaurav Kumar, Madeleine Dred Scott-Spencer and Matt Waggle for their pro tips on getting the most out of ZBrush to get body of work that stands apart from the rest. Here's what they had to say.
And if you're later to a greater extent aspiration rather than tips, then check out this year's unexcelled 3D movies operating room some of our favourite 3D art.
01. Set work screen
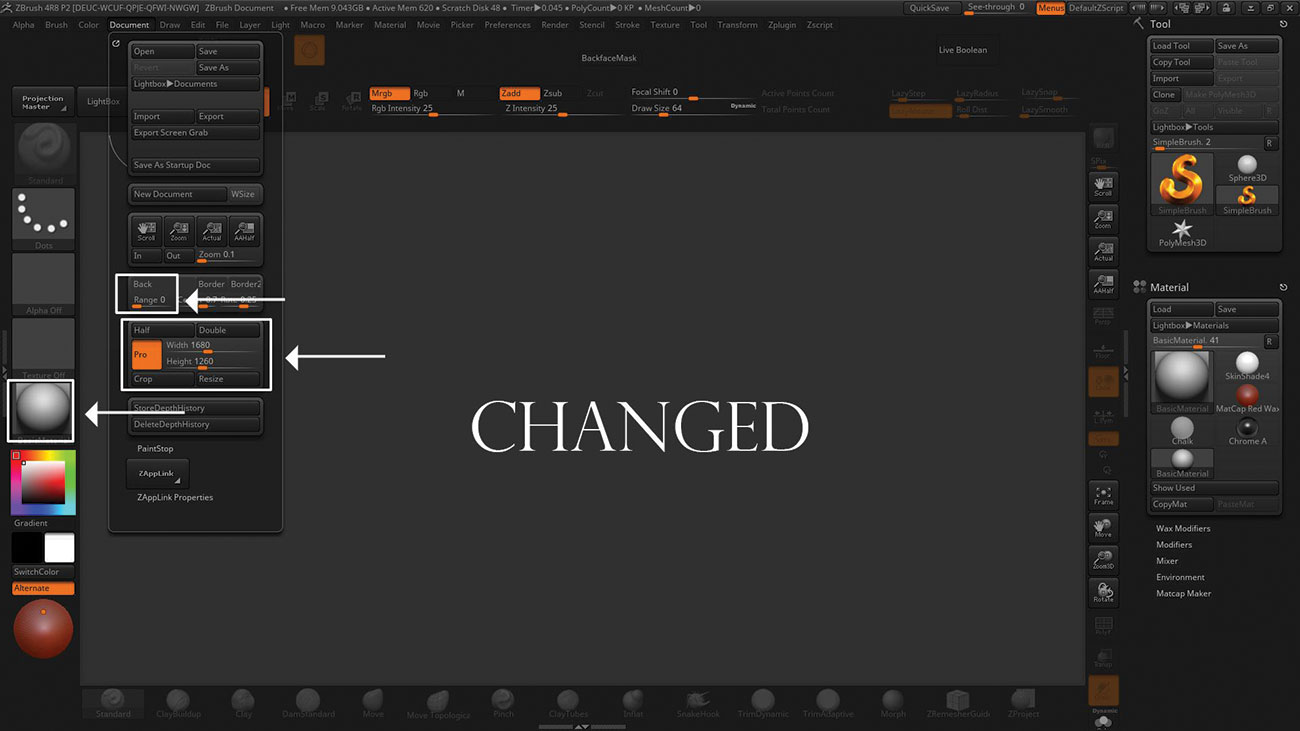
A selfsame basic only important thing to execute is set your work screen in a sense that lets you utilise IT fully. Attend Document in the toolbar and set the size of your papers reminder resolution to make a point there are no unused areas. You can too alter the ZBrush screen from Grey to gradient black for a consistent background screen out. Thirdly, I would suggest that you vary the textile from MatCap Cerise to MatCap Grey or fundamental gray-haired material.
- 3D art: 27 stunning examples to inspire you
02. Customise your UI
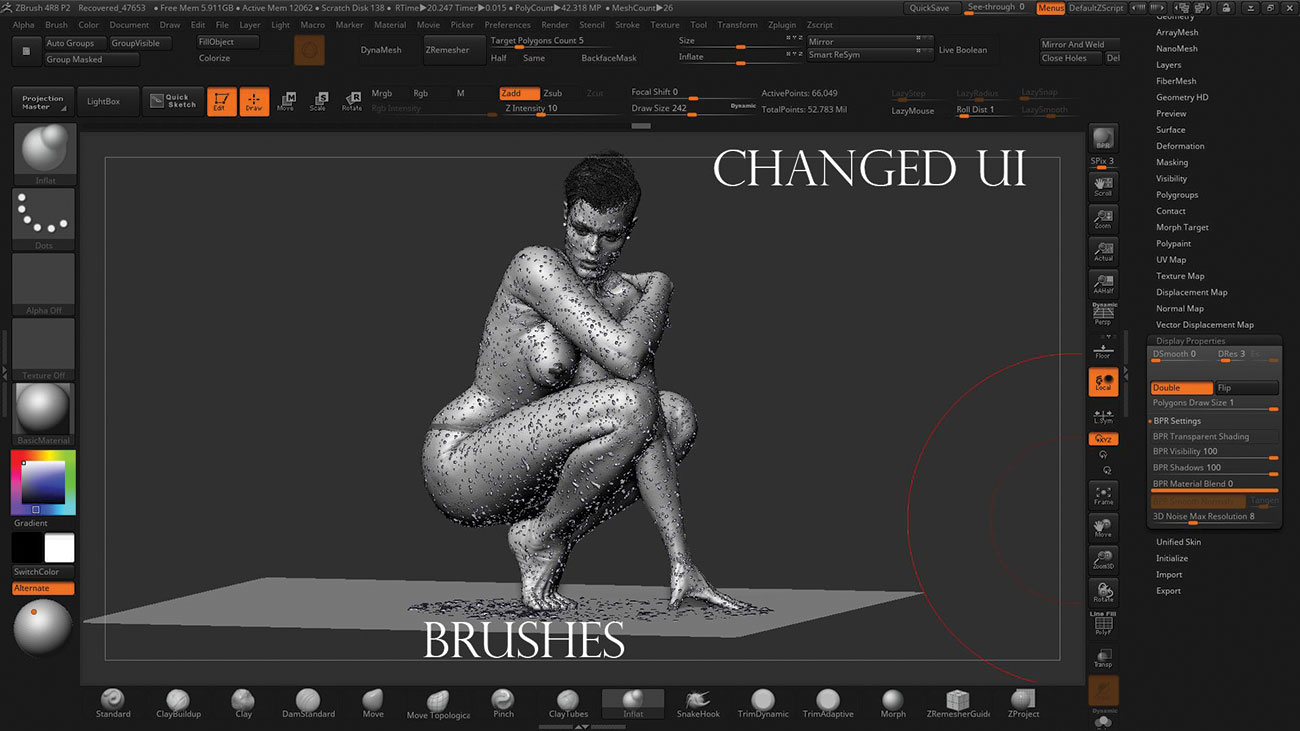
This is a very effective way to gain the speed of your form. Go to Preferences in your toolbar, select Config > Enable Customize. By pressing ctrl+elevation you can move whatsoever push button, palette or brush onto your ZBrush port. Once you've added your most-utilized brushes and options to your UI go back to Config and detent Save UI and Store Config. This will help to make your creative procedure easier and faster.
03. Use the timeline
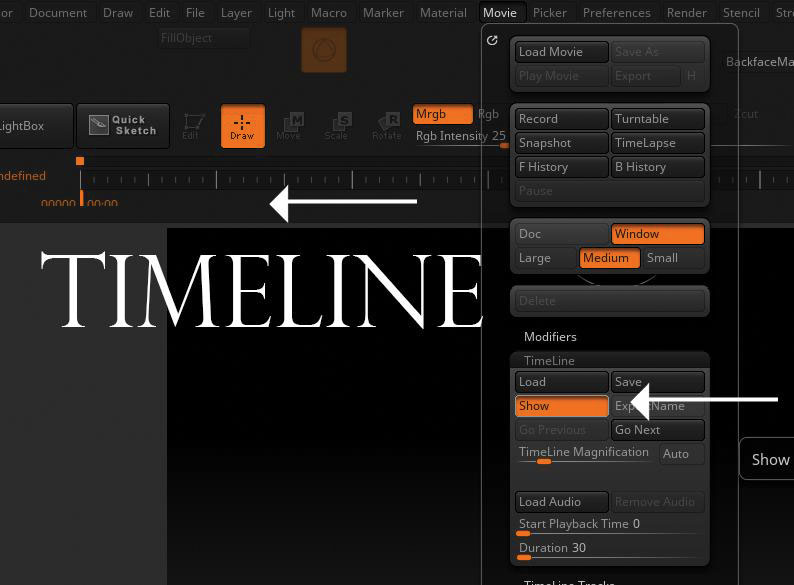
This is a great way to move on quickly from one angle to another. When working on a stupendous model it becomes difficult to see it from all sides, so you fanny attend Movie in the toolbar and under Timeline wind up Appearance. This will put the timeline camera on the top of the silver screen, soh you arse position your model and clink on the timeline to add a keyframe. This can be through with in whatever position that you May motive to construe again operating theatre work on quickly, and you can move through them quickly victimisation the pointer keys.
04. Store camera angles in timeline
ZBrush introduced the timeline for spiritedness purposes, but information technology is also a great way to store camera position quickly. This is useful if you are aligning your sculpts to multiple reference photos for sculpting a likeness. When you have your sculpt allied merely store a keyframe for each position you need.
05. Learn ZBrush shortcuts
There are respective ZBrush shortcuts to learn that will speed rising your work flow. These include pressing Y to toggle betwixt the Transpose instrument and the newer 3D Gizmo. Press C to colour-pick anything connected your screen and IT will become your prevalent people of color. Use Z and Geological fault+Z to call up and dismiss spotlight. You bathroom make some convenient macros for play up. Holding Chemise+ctrl toggles from your brush to your new pare, slit or clip curve tool. Plus, while this is held only these types of tools appear for easy pick.
06. PureRef and ZBrush transparency
Use PureRef for creating visualise sheets of source when sculpting. You can cover some monitors with the PureRef windowpane so that part of it is always stern ZBrush. Then usance the Vaporous characteristic in the upper-right box of ZBrush to uncover and check against the reference held in PureRef.
07. Create basic forms in low subdivision
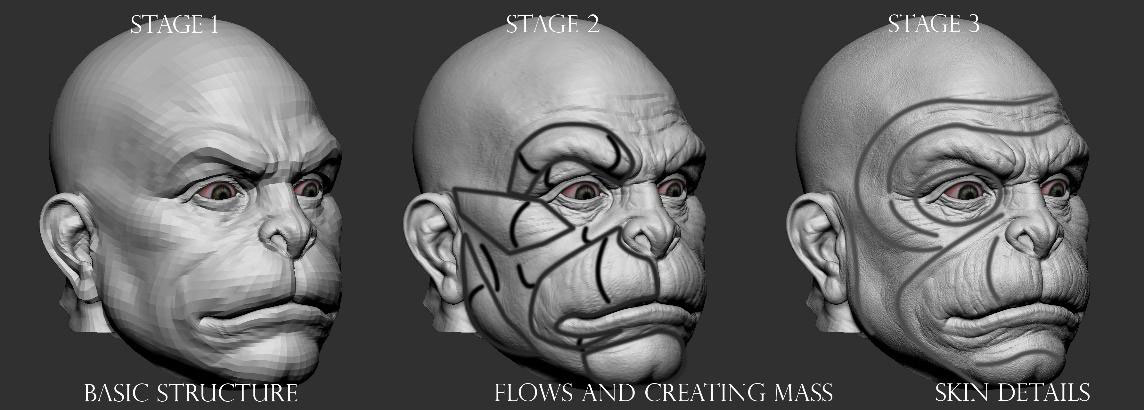
Create most of the shapes of the model in the lowest subdivision so that the forms can constitute made right with the least poly. It's much easier to pull off and edit a lighter mesh than a heavy matchless. Always try to sculpt in the same flow of muscles or skin to make the model look real.
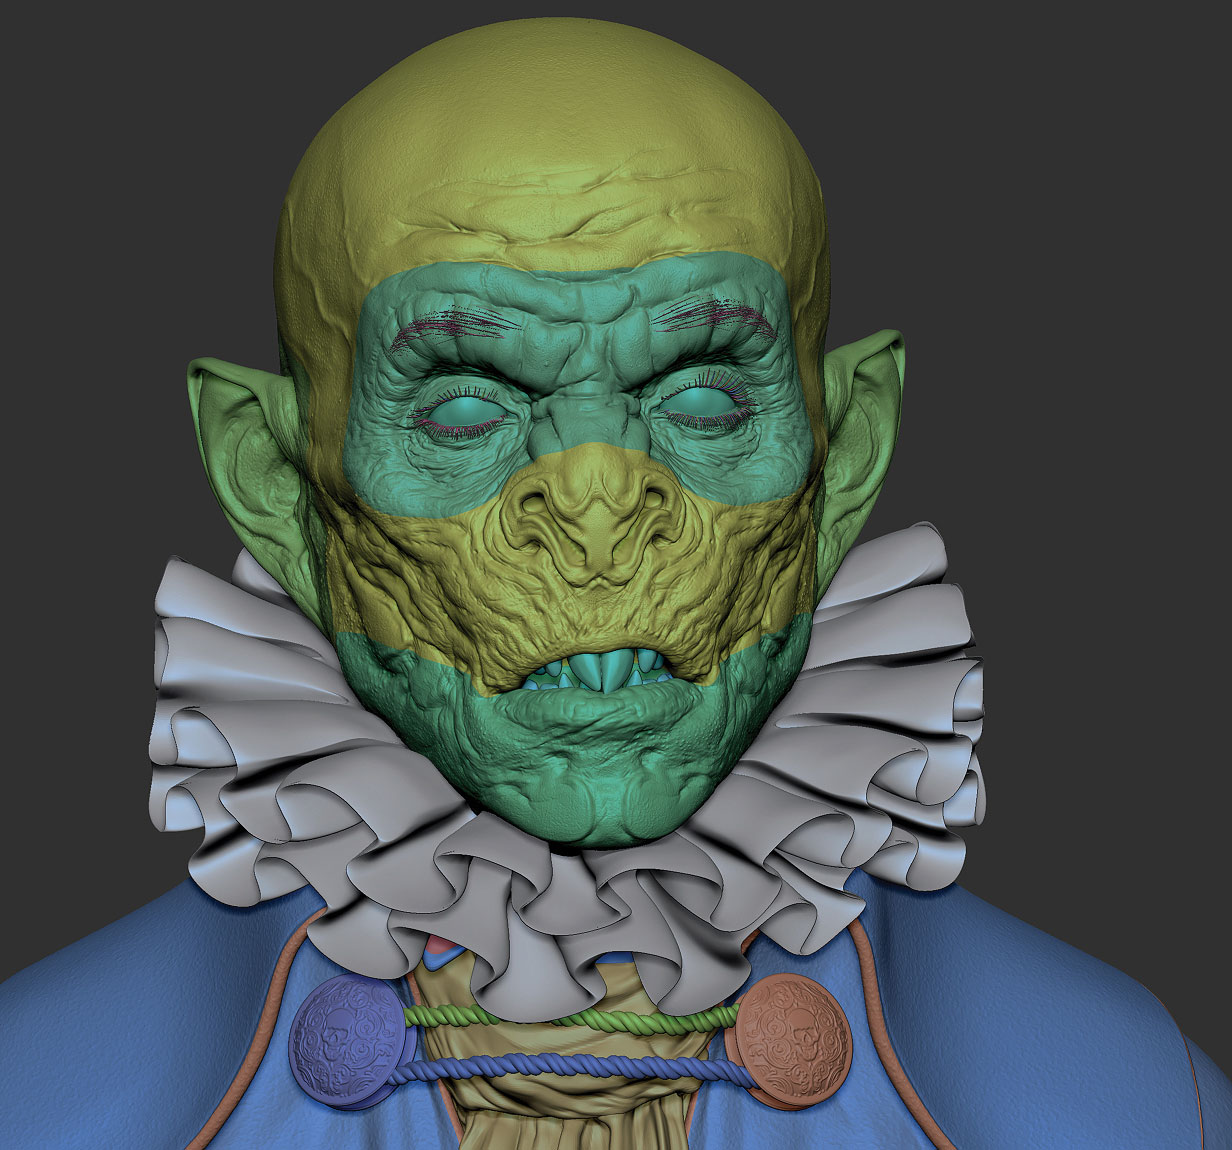
08. Transpose smart masking

Transpose is a impertinent tool for masking certain areas of your model. If you hold ctrl and then click and retarding force the model, you can mask with the Transpose Saucy brush. It will look at the surface and mask the rest of the area, departure any inflated spaces, as seen in the visualise.
09. Amp detail the easily way
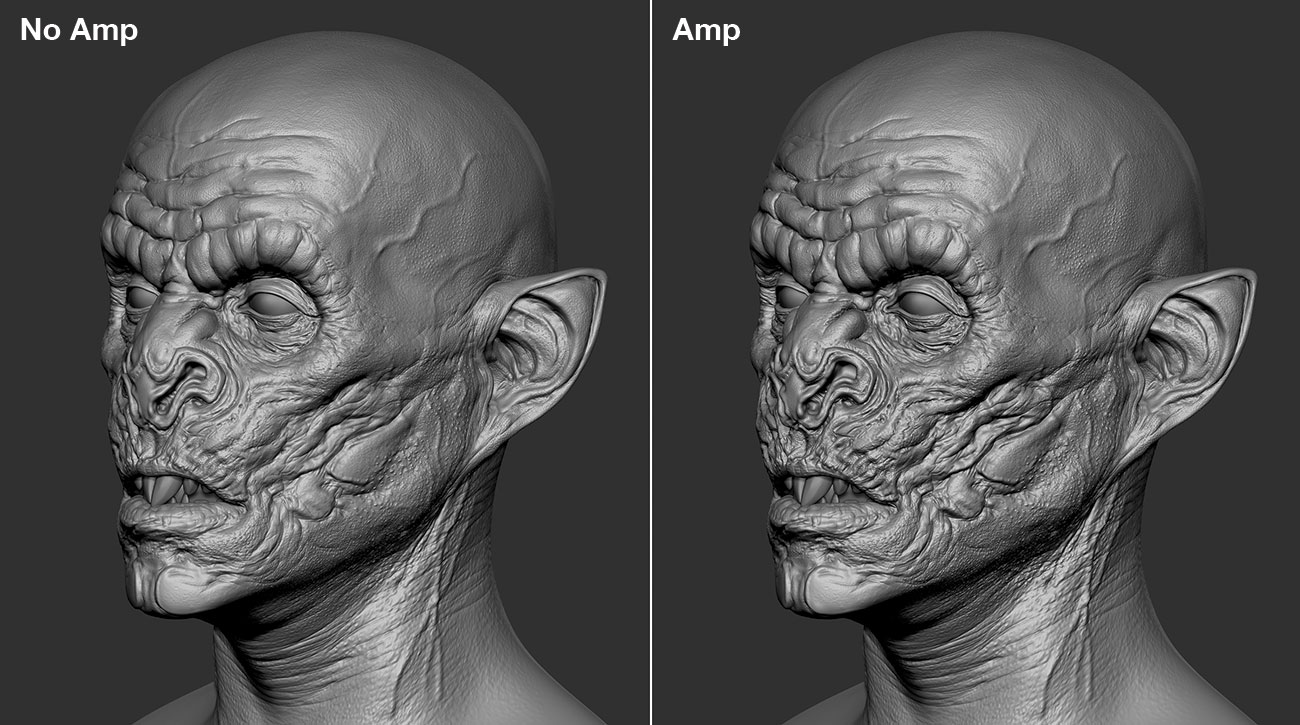
Go and search Ryan Kittleson's Macro script. It could save you some metre when sharpening up your sculpted details. Put in the hand and find IT in your Macros folder, and then sit back and Army of the Righteou it work its magic.
10. Make use of Sculptris Affirmative
You can use Sculptris Pro to add details to your already-decimated models; instead of rhenium-DynaMeshing your prepared sculpt, just move in again with Sculptris In favour of without the restrictions. You can easily modify and bestow small details until you're willing.
11. Economic consumption Polypaint to add semblance
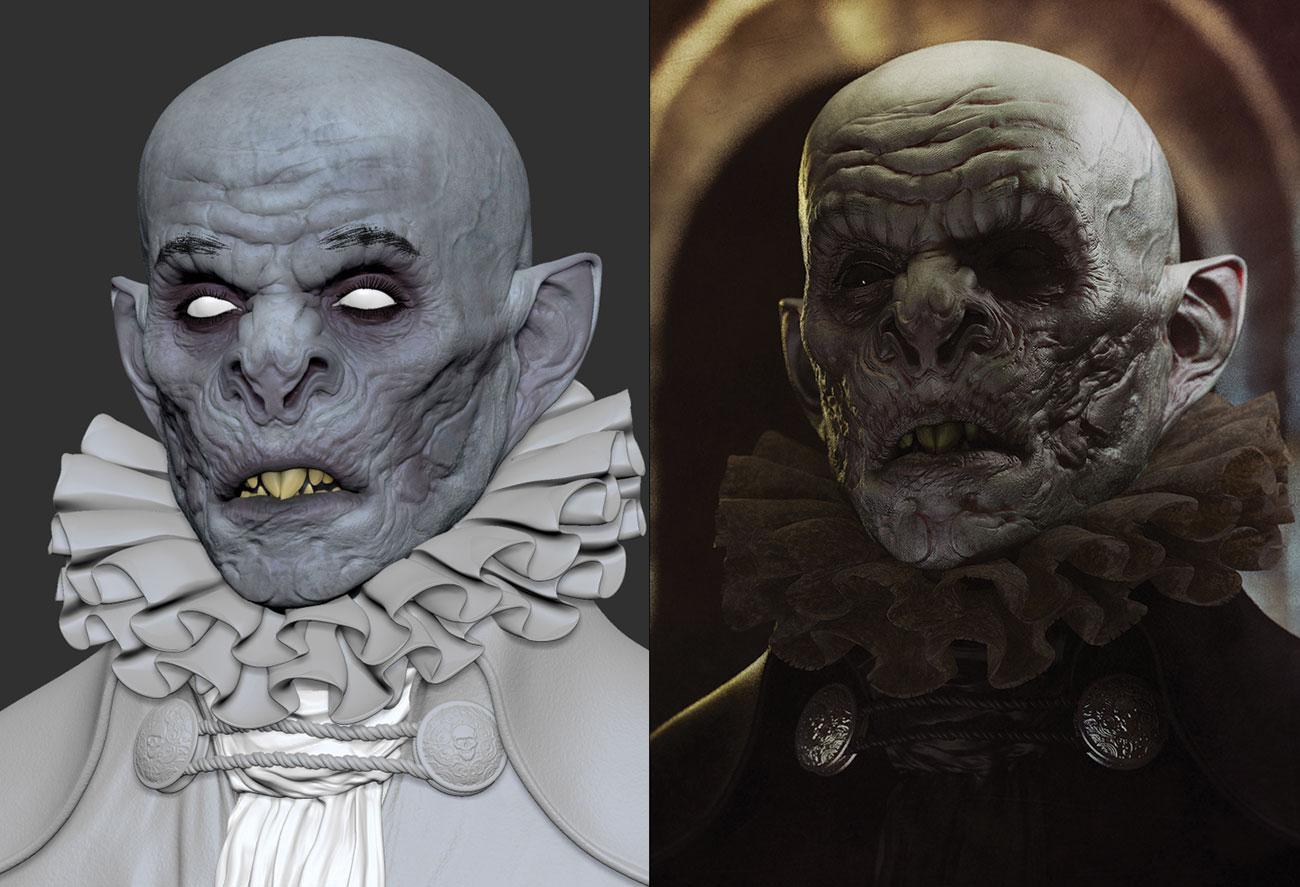
Polypaint is very utile when it comes to adding colorise to your firearm. The virtually important matter, yet, is to rent the sculpt perform its magic. All the sculpted details testament arrest the highlights. When applying the Polypaint start scaly and pinch it with the RGB value of your copse. A little bit of Polypaint john get a big resultant role when it comes to the inalterable visualise.
12. Quai wrap retop
One of the main ways to create stunning models these days is to sculpt the initial form in programs like ZBrush or Mudbox and then retopologise the sculpt. This is the process where you create newfound geometry that is more animation-friendly, more predictable with contiguous adjoin loops and some lower in polygon count, qualification it more efficient. You can of course do this in Celluloid 4D with tools equal the Polygonal shape.
To make it even ameliorate you can download scripts equivalent the Hemoglobin Modeling Bundle that make Cinema 4D into a perfect retop resolution, enabling you to draw new geometry suitable onto your sculpt. Find a range of options here.
13. Utilise bark alphas
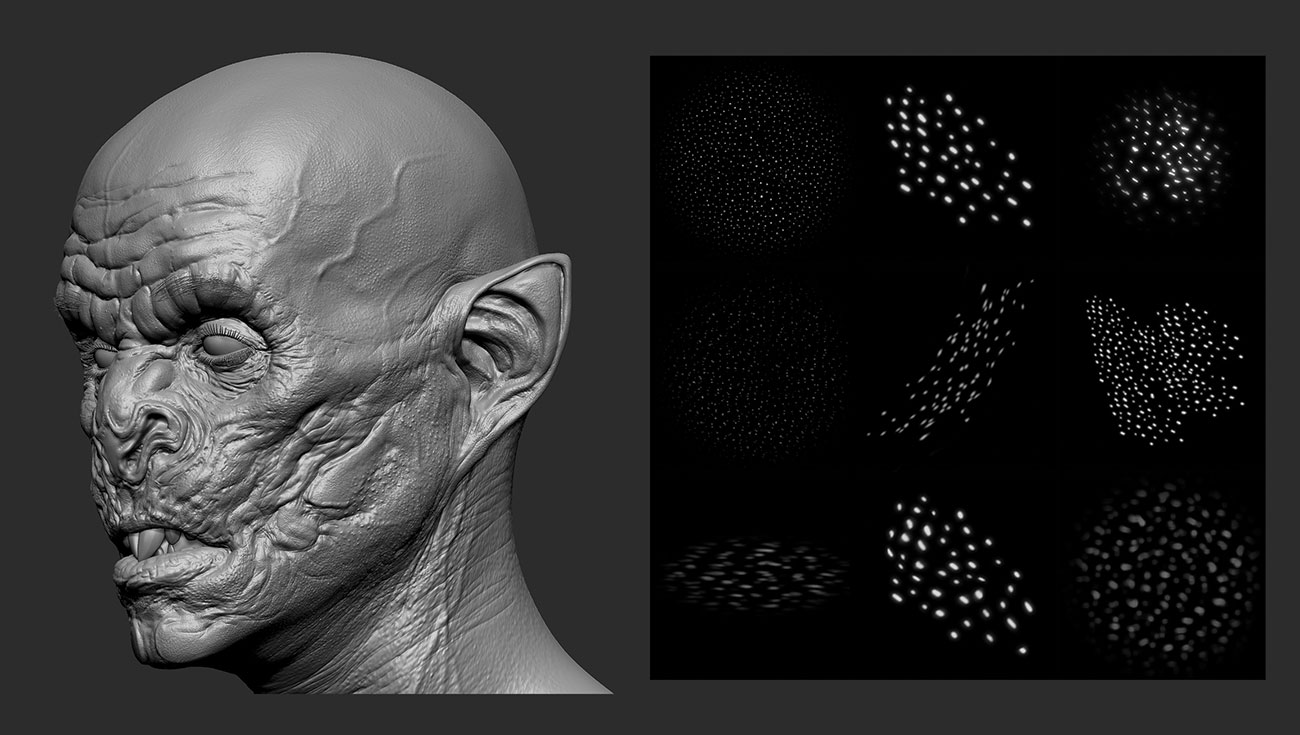
Stress to merge different types of alphas with a positive and negative value over each unusual. Essay switching exterior betwixt big ones and small ones to give information technology a natural blend. Also, for adding veins a small trick that I use is to fall a some subdivisions and draw in the vein – if you come to the fore again, information technology will blend utterly like information technology's under the surface, instead of laying on top.
14. Use Hi-fi Twist Mode for spines/spikes
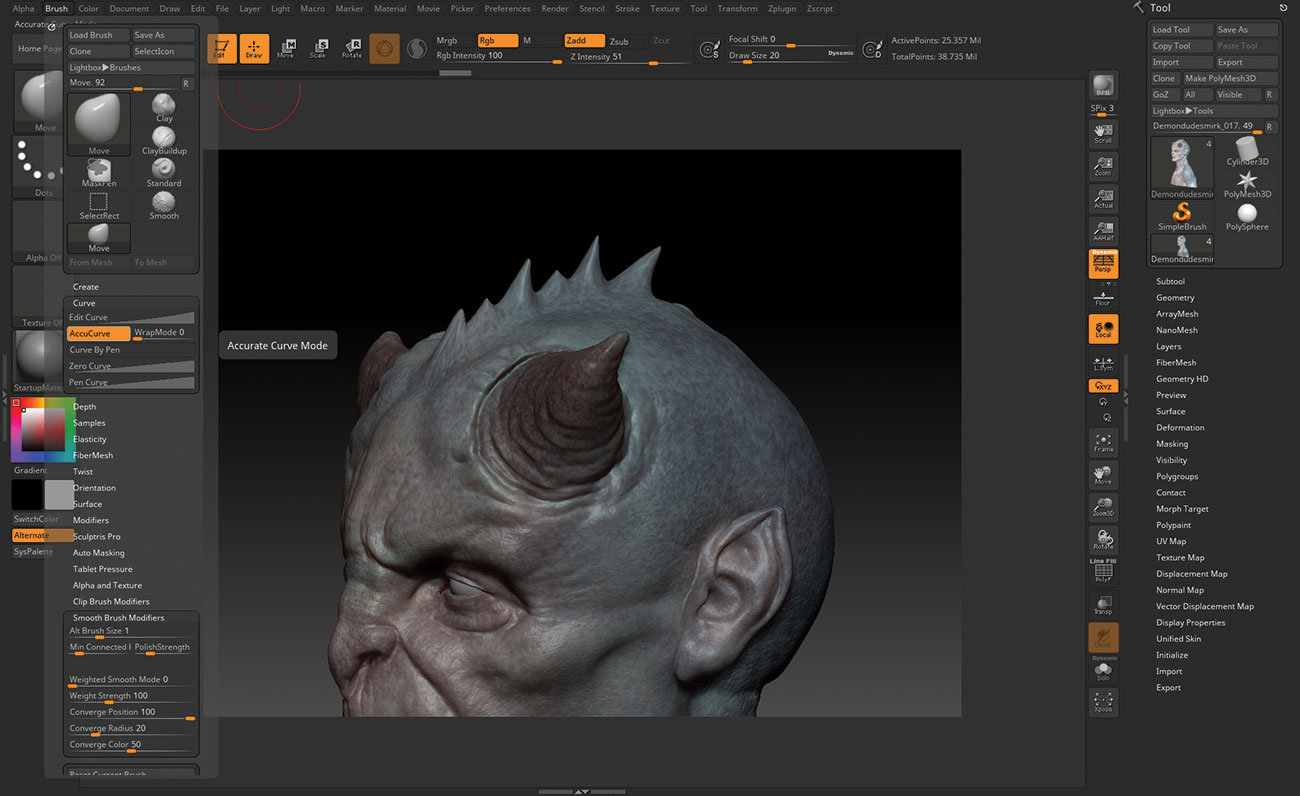
One look of the Move brush is that the falloff tends to create a rounded centre to the brush effect, fashioning it indocile to create a sharp protrusion like a spine, spike or peak. To fix this you can redact the settings of the Move out copse. Select the Act upon thicket and so pass to Light touch > Arc and turn on the AccuCurve button. This forces ZBrush to use the clash curve in that menu to define the falloff of the brush. The result as you can see is a sharp, precise Move brush.
15. Aline the smooth brush settings
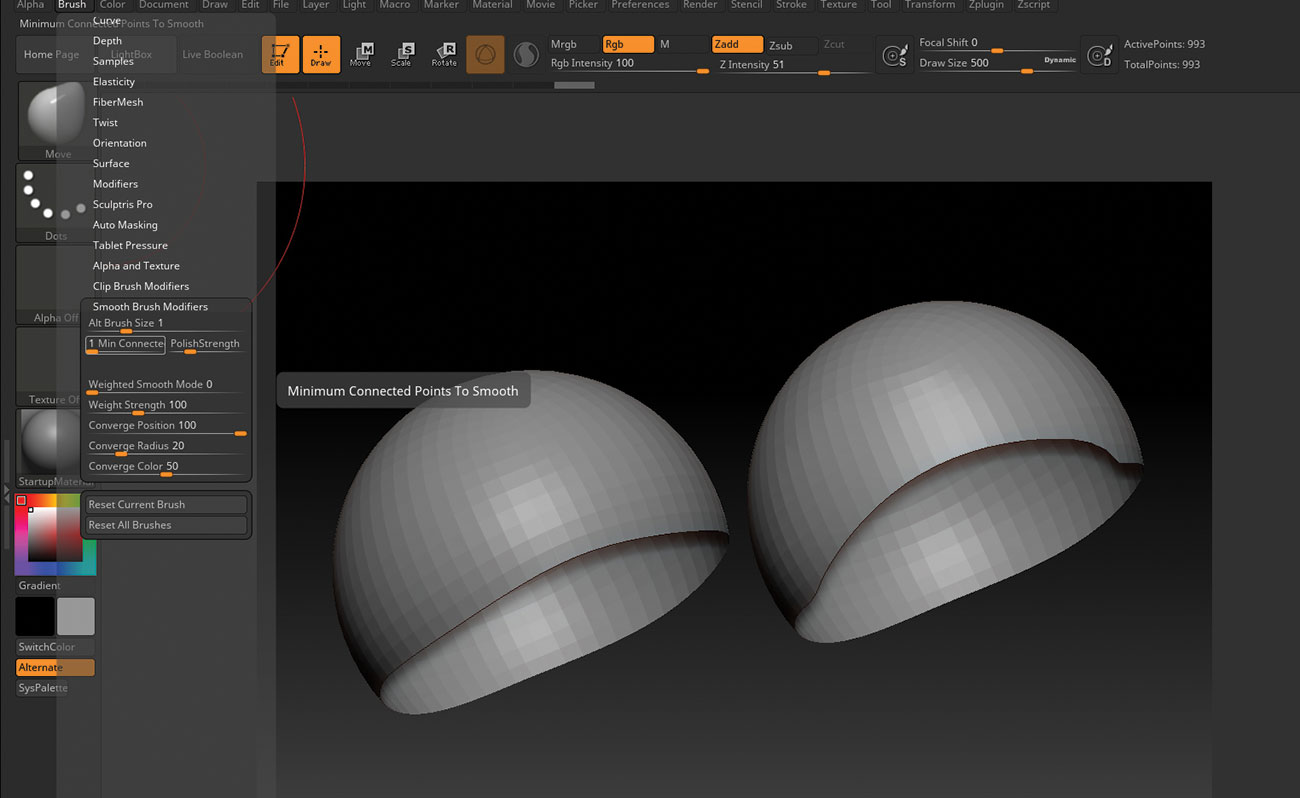
When using the Smooth brush many users realise how difficult it can be to smooth border edges happening poly geometry or single stray points that feature been shifted from the original theoretical account, arsenic sometimes happens when protruding geometry. Smoothing these geometry types can frequently produce unsatisfying results. A good tip is to edit your Smooth copse settings to allow the brush to be more trenchant on receptive geometry edges and single points. Go to the Brush > Flowing Thicket Settings menu and lower the Min Connected slider to 1. The Smooth sweep will now be much more effective in these areas.
16. Turn tablet pressure off
You don't always have to have tab insistency on – and disabling it can profit certain brush effects along your sculpt. You can find the tablet pressure setting under Preferences>Pad of paper and toggle IT on and off. When it's off you'll be competent to use the pen, but the brush won't have some pressure level effects.
17. Use Polish Features to cleanable up panel loops
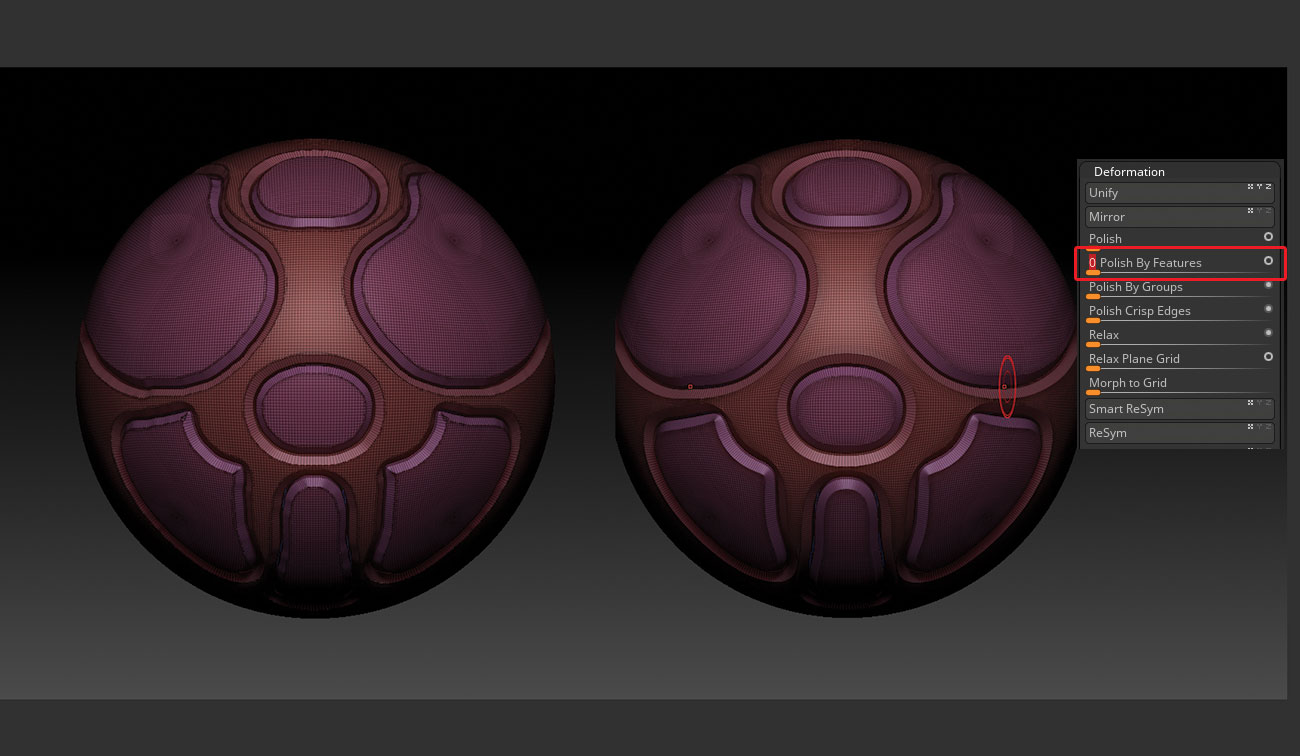
When generating jury loops from polygroups, we often find that the edges of the mask and the sequent polygroup creates an irregular fles to our panel loop geometry. A great mode to correct this and give the model a nice machined look is to polish by features. This yellow-bellied terrapin is found low Tool > Deformations. After you have generated your dialog box loops open the Deformation stand in-menu and come home on the Light button on the Smooth by Features slider. This volition look away care a black dot in a circle instead than a empty dot. Now set up the slider incrementally and you will see the edges of your loops clean raised and look remote more pleasing.
18. Use Draw Size and High-octane mode buttons
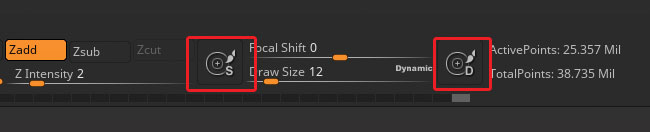
Often when I'm working in ZBrush I will stool changes to my draw sizing and in many cases the Dynamic stage setting on my brushwood. Antecedently this setting was global for all brushes, soh if you were to make a change to your draw size whilst running in curves it would impact whatever other brushes in use. In the new ZBrush you dismiss at present enable a per-brush Describe Size and per-brush Dynamic mode. Simply enable the buttons at the top of the screen to have far to a greater extent control over for each one brushing setting.
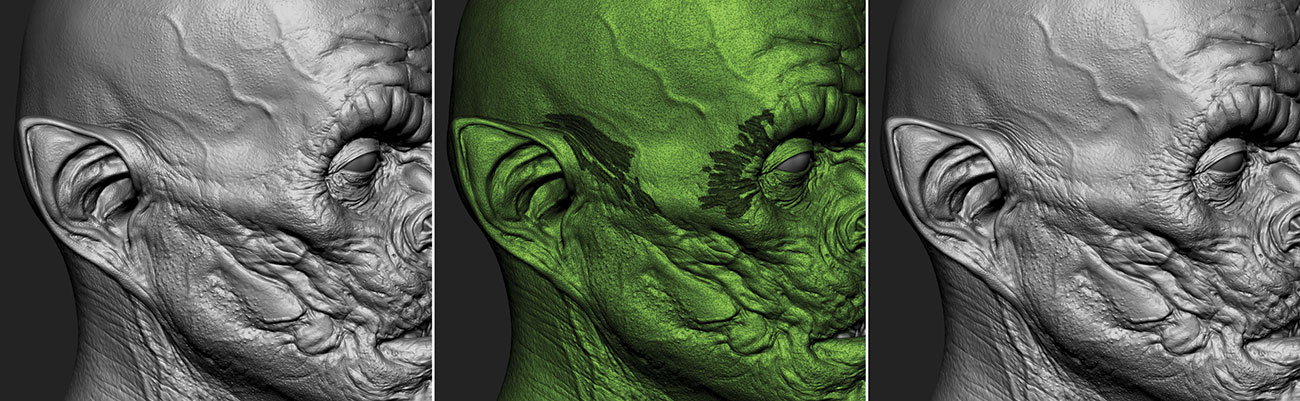
19. Use Morph Targets to help immingle cancelled detail
Indefinite of the trickiest aspects of adding ok details to a model is determination the best way to fade one texture into some other, or to languish out inside information completely. We desire to debar a uniform 'stamped-on' feel. In front I start up to tot fine details I leave put in a morph place of my framework in its undetailed state by going to Tool > Morph Prey > Store MT. Straightaway every bit I detail the mesh I can use the Morph brush to blend back out to the undetailed rise up. This is much amend than smoothing because the Smooth brush erases detail while the Morph brush will softly reduce its intensity. It's a so much Sir Thomas More effective blending brush.
This is an altered version of pieces that were originally published in 3D World , the world's popular magazine for CG artists. Take 3D World here .
Related articles:
- ZBrush 2022 review
- 14 ZBrush workflow tips
- ZBrush at the movies
Help Zbrush Draw Only One Tool
Source: https://www.creativebloq.com/features/15-tips-to-master-zbrush
0 Response to "Help Zbrush Draw Only One Tool"
Post a Comment